Add Edge Gateways
Use this page to register a new Edge Gateway in the cloud.
Two onboarding modes:
- Online gateway — the gateway has internet access and can present itself to the cloud
- Offline gateway — the gateway cannot reach the cloud (or must be onboarded manually)
If the gateway can reach the cloud (outbound internet allowed), choose Online.
If the gateway is isolated, air‑gapped, or must be commissioned manually, choose Offline.
Before you begin
A few concepts you will see during onboarding:
-
Company
Where the gateway belongs (used for scoping, filtering, and access). -
Fleet (optional)
Grouping for shared assets (configurations, dashboards, alerts, resources, cloud storage, …). -
Configuration (optional)
Template applied to the gateway. Can be selected now or later. -
Retentions
Where the gateway should write data (storage targets).
If you need a new retention, create it in the Storage Hub app. -
“No data” alerts (optional)
Device-specific alerting to detect when the gateway stops delivering data.
You can onboard a gateway with minimal info (company + name) and refine later.
Most settings remain editable in the gateway detail page.
Online gateway (recommended)
When to use
Online onboarding is used when a newly running gateway can reach the cloud.
The gateway will present itself automatically and appears in a selectable list.
What happens
- Gateway starts and announces itself to the cloud
- You select it from the list (matching identity/GUID shown in the UI)
- Cloud registers the gateway and applies your chosen options
Steps: add an online gateway
- Go to Sources → Edge Gateways
- Select the + button in the top right corner.
- Choose Online gateway
- From the list of discovered gateways:
- select the gateway that matches your intended device (identifier/GUID)
- Fill in the required fields:
- Company
- Name
- Optional fields (recommended when available):
- Fleet (optional)
- Coordinates (optional; improves map view and site context)
Configuration (optional, but common)
If you select a Configuration during onboarding:
- option to push immediately to the gateway
- or skip push and apply later
Pushing a configuration may restart edge applications or briefly interrupt data flow, depending on what changes. Use immediate push when commissioning a new gateway, and delayed push when you want a controlled rollout window.
Retentions (data destinations)
Select which retentions this gateway should write to.
- choose one or more retentions from the list
- retentions define where collected data will be stored
Create or update retentions in the Storage Hub app first, then return here.
“No data” alerts (optional)
Enable device-specific “No data” alerting during onboarding if you want the platform to notify you when:
- the gateway stops sending data packages, or
- data delivery is unexpectedly interrupted
Finish
Click Confirm. The gateway will be registered and visible in the Edge Gateways list.
Offline gateway
Choose Offline gateway when the device (or service) cannot directly reach the cloud, or when onboarding must happen through a manual or indirect flow.
Offline onboarding still registers the gateway/service in Capture so it can be authorized, licensed, and managed—even if it is not currently connected.
Pick the option that matches what you are registering: a physical edge gateway (Logger), a third-party sender (External Connection), or your RetroCapture bridge (ServiceTool).
Offline types
When you create an offline gateway, you will be asked to select one of the following types:
Logger
Use this for an offline edge gateway device. Even offline gateways require a license to run properly. This option allows you to register the device in Capture so licensing and configuration can be managed.
External Connection
Use this when an external service (not a Capture edge gateway) needs to push data into Capture. These senders still require registration and authorization so data ingestion can be controlled securely.
See External Connections for a full guide on how External Connections work and how to push data from your service.
ServiceTool
Use this when you use RetroCapture to sync offline devices to the cloud. Register your RetroCapture instance here so Capture can recognize it as an authorized synchronization tool.
Offline does not mean unmanaged. Registration ensures identity, authorization, and licensing are in place before data or configs are exchanged.
Steps: add an offline gateway
The overall flow is similar to adding an online gateway (company, name, optional fleet/config/retentions), with one key difference:
- You must provide the Activation UID manually.
- Go to Sources → Edge Gateways
- Click Add Edge Gateway
- Choose Offline gateway
- Select the offline type (Logger, External Connection, or ServiceTool)
- Fill in:
- Company
- Name
- Activation UID (manual; see below)
- Optional (same as online onboarding):
- Fleet
- Coordinates (if relevant)
- Configuration (can be assigned now or later)
- Retentions (where the device should write data)
- No data alerts (device-specific monitoring)
If you need a new retention target, create it first in the Storage Hub app, then return here to select it.
Finding the Activation UID (manual)
For offline onboarding, the Activation UID is the device’s GUID and must be copied manually.
To find it, check the CloudManager service of the edge gateway:
- On a machine that can reach the gateway in the network, open a browser
- Navigate to:
http://<ip.address.of.the.gateway>:5004/api/ui
- In the CloudManager UI, locate:
- license status (valid/invalid)
- the gateway GUID
- Copy the GUID
- Paste it into the Activation UID field during offline onboarding
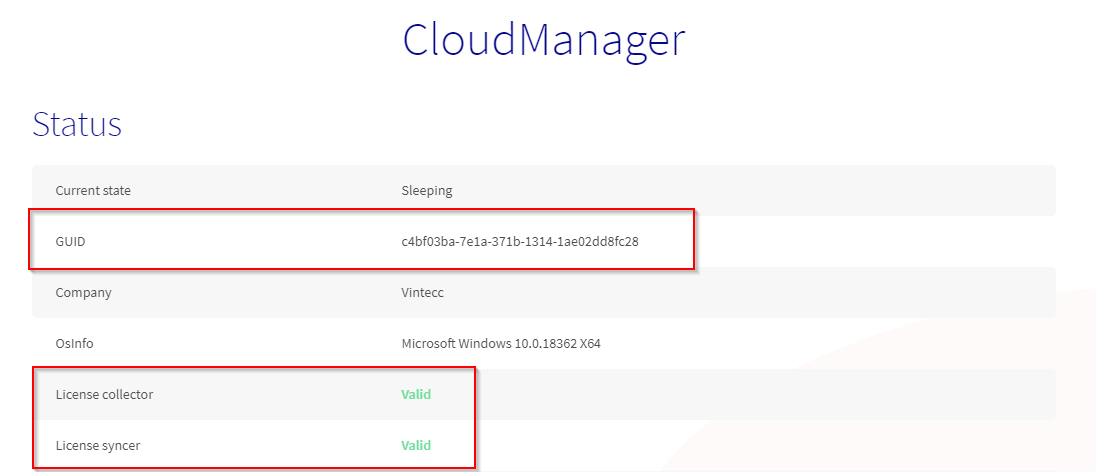
The CloudManager UI is an operational endpoint. Expose it only on trusted networks and ensure firewalls are configured appropriately.
It is normal for the license to appear invalid before onboarding completes. After registration, licensing can be issued and the gateway can become fully operational once activation is applied.
After onboarding
Once the gateway is created, verify the essentials:
- Gateway appears in the Edge Gateways list
- Heartbeat is updating (device is alive)
- Last data package is updating (data is arriving)
- Configuration status makes sense:
- warning icon → not in sync
- orange loading → push in progress
- green sync → up to date
If you assigned a configuration and chose immediate push:
- watch for the orange loading icon
- confirm it resolves to green sync
- validate using Explore Data in the gateway detail page
Edge Gateways list → open gateway → Messages (check for errors) → Explore Data (confirm latest data).
Common pitfalls
Typical causes:
- gateway has no outbound connectivity to the cloud
- DNS/proxy restrictions
- firewall blocks required ports In that case, use Offline gateway onboarding or fix network access.
Gateway is alive, but not delivering data. Check:
- configuration applied
- variables filled in (e.g., IP address placeholders)
- edge application status in the Overview tab
- Messages tab for runtime errors
If no retention is assigned, data may not be stored where you expect. Assign retentions during onboarding or via the gateway detail page afterward.